

A Heel and Toe to Suit Every Purpose
You can plan out the structure of your sock depending on the purpose of your sock or the type of yarn you’ve chosen. We’ve put together a glossary of basic heel and toe options for building your perfect sock.
Square Heel (aka Dutch Heel)

Description: For this heel, you first knit the heel flap in a slip stitch pattern, and then you turn the heel. The slip stitches add durability to the heel flap. This is the most popular type of heel. This is recommended for single-color yarns.
Basic technique: Work your heel flap on 50% of your stitches (usually around 30-32), slipping the first stitch of each row. For the heel flap, the Square Heel uses a slip stitch pattern of sl1, k1 on RS rows, purling all stitches on WS rows.
Turn your heel by working back and forth on the center 10 heel stitches, making an SSK on RS rows and a p2tog on WS rows. You should have between 8 and 12 stitches left on the heel. Resume knitting in the round, picking up about 16 stitches along each side of the gusset. Every other round, decrease 1 stitch at either side of the gusset until you have returned to your beginning number of stitches (usually 60-64 stitches).
Watch our video tutorial that will take you through knitting a basic sock heel with a flap from the top down here.
Round Heel (aka French Heel)

Description: This heel is similar to the Square Heel, but the heel turn is gentler and results in a smooth, curved heel.
Basic technique: Work your heel flap on 50% of your stitches (usually around 30-32), slipping the first stitch of each row. For the heel flap, the Round Heel uses a slip stitch pattern of sl1, k1 on RS rows, purling all stitches on WS rows.
Turn your heel, starting the turn on the center 5 to 8 stitches. Work the heel turn until you have reduced the number of heel stitches to about 16-18 stitches. Resume knitting in the round, picking up about 16 stitches along each side of the gusset. Every other round, decrease 1 stitch at either side of the gusset until you have returned to your beginning number of stitches (usually 60-64 stitches).
V-Heel (aka Handkerchief Heel)
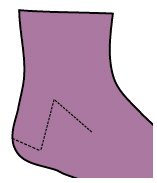
Description: For this heel, you first knit the heel flap in a slip stitch pattern. When you turn the heel, you’ll increase the number of center stitches by 1 each row, at the same time decreasing along the center point of the heel. This will result in a V-shaped heel turn. This works well for people with narrow heels. This heel is best for solid-color yarns.
Basic technique: Work your heel flap on 50% of your stitches (usually around 30-32), slipping the first stitch of each row. For the heel flap, the V-Heel uses a slip stitch pattern of sl1, k1 on RS rows, purling all stitches on WS rows.
Turn your heel by knitting to one stitch before the halfway point of the heel. ssK, k1, then turn your work. On this next WS row, sl1, p1, p2tog, p1, then turn. sl1, k2, ssk, k1, then turn. sl1, p3, p2tog, p1, then turn. Continue working one more stitch each row until all of the stitches have been worked. Resume knitting in the round, picking up about 16 stitches along each side of the gusset. Every other round, decrease 1 stitch at either side of the gusset until you have returned to your beginning number of stitches (usually 60-64 stitches) knitting in the round for the foot of the sock.
Band Heel (aka German Strap Heel)

Description: This heel has a rectangular band that bisects the back of the heel. This heel is seen in a lot of vintage patterns. This heel is best for solid-color yarns.
Basic technique: Work your heel flap on 50% of your stitches (usually around 30-32), slipping the first stitch of each row. The heel flap on the Band Heel is usually worked in stockinette.
For the band shaping, you’ll work about 12 stitches, k2tog, work your band stitches, ssk, then work the remaining 12 stitches. Work one row even. Continue working these two rows, keeping your band stitches at the same number, until you’ve decreased down to about 24 stitches. Turn your heel by knitting back and forth across the heel, making a SSK right before the band stitches on RS rows and making a p2tog right before the band stitches on WS rows. You should have between 8 and 12 stitches left on the heel. Resume knitting in the round, picking up about 12 stitches along each side of the gusset. For this heel, you don’t have to decrease gusset stitches before starting the foot.
Short Row Heel

Description: This heel is entirely comprised of short rows. The heel turn decreases two stitches each row, resulting in a smooth, gently cupped heel. This is great for variegated or hand painted yarns because it doesn’t interrupt the flow of the colors.
Basic technique: Work your heel flap on 50% of your stitches (usually around 30-32). The heel flap on the Short Row Heel is usually worked in stockinette. Knit all the way across your heel until you have only one stitch left. For example, if you have 32 heel stitches, k31. Turn your work, YO, then p30 back across the row. Turn your work, YO, k29 across the row. Continue in this manner until you are only working on about 1/3 of your starting stitches. In this example, we’ll work until we have 16 stitches remaining.
To turn the heel, YO, k16, k3tog, turn. On the WS row, YO, p17, p3tog through the back loop, turn. Continue this way, increasing the number of stitches worked plain by one each row, until you have decreased down to your starting number of heel stitches. Resume knitting in the round for the foot of the sock.
Classic or Standard Toe
Description: This is one of the most popular types of sock toes. At each side of the foot you make a pair of decreases (increases if you’re knitting toe-up) separated by two stitches.
Basic technique: Divide your toe stitches evenly onto two needles, instep stitches on one and sole stitches on the other. On the instep needle, K1, ssk, knit to the last 3 stitches on the needle, k2tog, k1. Repeat this for the sole stitches. Work one round in pattern. Continue to work these two rounds until you have decreased to half of your starting stitches (usually 30-32 stitches). At this point, work the decrease round every round until you have 16 stitches left, 8 on each needle. Use the Kitchener stitch to close the toe.
Round toe
Description: This toe is similar to how you would decrease a hat. Decreases are worked at regular intervals around the toe.
Basic technique: Decrease using a k2tog every six stitches, then knit 5 rounds in pattern. Decrease using a k2tog every five stitches, then knit 4 rounds in pattern. Continue to decrease this way until you have only 8 stitches left. Cut your yarn, pull it through the remaining 8 stitches, and then pull the toe closed as you would at the top of a hat.
Double-decrease toe
Description: The shape of this toe is similar to the Classic Toe, except that it has a line of centered double decreases down each side of the foot.
Basic technique: Divide your toe stitches evenly onto two needles, instep stitches on one and sole stitches on the other. For the decrease round, work to 3 stitches from the end of the needle and slip 2 stitches as if to knit, knit one stitch, then pass the two slipped stitches over the knit stitch. This creates a centered double decrease. Repeat for the second needle. Work one round in pattern. Repeat these two rounds until you have decreased to half of your starting stitches (usually 30-32 stitches). At this point, work the decrease round every round until you have 16 stitches left, 8 on each needle. Use the Kitchener stitch to close the toe.
To learn more about how to work the Kitchener stitch, watch out video tutorial here.