

Joining Borders for a Personal Touch
After you have finished the center section of your stole or shawl, you may want to add a decorative lace border to the whole piece. Different borders produce different effects, from flat rectangular borders with mitered corners to flouncy lace ruffles that move with you when you walk.
Knitted-on Lace Borders
Lace needs to stretch and flex, so there are some special considerations to take into effect in the construction of your finished piece. In order to keep your finished piece as stretchy as possible, avoid binding off edges and use a provisional cast on edge. You should also avoid joining borders using the mattress stitch or backstitch, as these two seam types are not stretchy. Below are instructions for adding knitted-on lace borders to three popular shawl shapes..
Round Shawls
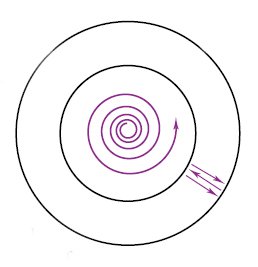
Round shawls are the easiest shape for adding a knitted-on border because they have no corners to work around. You will work back and forth on the border perpendicular to the main body of the shawl and, on WS rows, you will knit the last border stitch together with a stitch from the main panel. For a flouncy lace edge, increase the number of border rows joined to each stitch of the main panel. When you reach the final row of your border, you will have to graft the end of your border together with the first row of your border. The directions for the border will usually have you do a cast on that leaves the first row stitches live so you can graft them cleanly.
Triangular Shawls
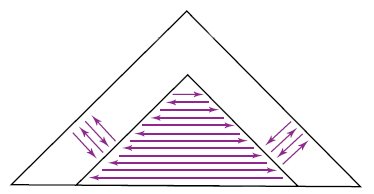
Triangular shawls are worked the same way as square shawls, but you only have one corner to ease your border around. You also don’t have to graft the ends of your border together. After you have completed the main central panel of your lace shawl, you will knit your border around the perimeter of your shawl. You will work back and forth on the border perpendicular to the main body of the shawl and, on WS rows, you will knit the last border stitch together with a stitch from the main panel. This results in two border rows being joined to one stitch of the center panel.
Square/Rectangular Shawls
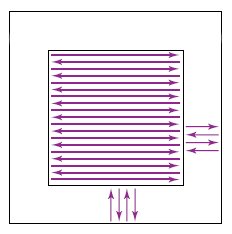
Knitted-on borders for square and rectangular shawls are worked the same way as circular shawls except for the corners. If you were to knit one stitch of your WS border row for each stitch of your main panel, your corner would not lay flat and would instead curl and pull. You can ease your border around the corner by using a combination of single, double, and triple joins.
Single Join: For every WS row of your knitted border, knit the last stitch of the border together with one stitch of your main panel. This works out to two rows of border joined to one stitch of the main panel.
Double Join: This join is used right before and after the corner of your main panel. Work as for a Single Join. On the next WS row, work a second Single Join into the same stitch from the main panel as you worked on the last WS row. This works out to four rows of border joined to one stitch of the main panel.
Triple Join: This join is used right at the point of the corner on your main panel. Work as for a Double Join. On the next WS row, work another Single Join into the same stitch as you used for the last two WS rows. This works out to six rows of border joined to one stitch (the corner) of the main panel.
When you reach the final row of your border, you will have to graft the end of your border together with the first row of your border. It is best to start and end your border along one of the straight edges of the shawl so that you do not have to graft in a corner.
Grafting the end of your border
When you get to the last row of your knitted-on border, you will have to graft it to the beginning row. Avoid seaming this join, as it will create an inelastic section and disrupt the natural stretch of your shawl. For basic lace border patterns, you can use the Kitchener Stitch stitch tutorial to join the two ends seamlessly. More elaborate lace border patterns may include special instructions on grafting for a seamless join.