Buttons and Buttonholes
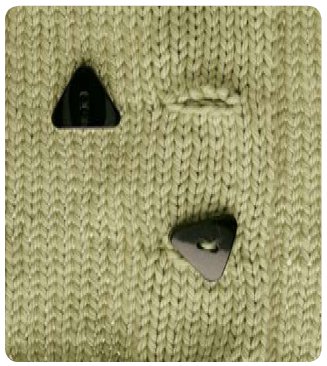
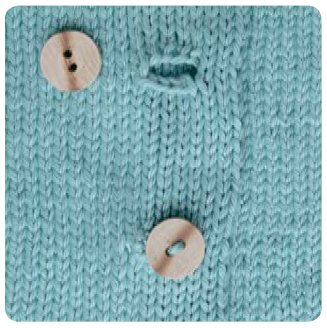
These seem like the simplest of closures but you will want to take careful consideration of the size of your buttons relative to the size of your garment as well as the function of the button (is it decorative or utilitarian?). After you have thought about these factors you are ready for the following steps…
Before making your buttonholes
Pick out the buttons for your project. Make a swatch with your chosen buttonhole style (one-row, two-row, ribbing, eyelet, vertical) and then test your buttons with the buttonholes. Make note of how elastic your yarn is—knitted buttonholes are prone to stretching, and you don’t want to find yourself weeks later with a sweater that just won’t stay closed!
Button selection—shank vs. flat

Usually shank buttons are best for knitted garments since the button shank gives more vertical clearance for the thickness of the knit fabric.

If you are using a flat button, you may want to create a shank by wrapping thread or yarn around the stitches that attach the button to the fabric. Wrap the stitches between the button and the fabric, then secure the thread or yarn with a knot at the back side of the fabric.

One-row buttonhole
The one-row buttonhole is a firm horizontal buttonhole that is self-edging. It isn’t very forgiving, though, so you won’t easily be able to adjust its tightness with overstitching.
1) Bring yarn to the front of work. Slip one stitch purlwise, and then bring yarn to the back of work. The one-row buttonhole is a firm horizontal buttonhole that is self-edging. It isn’t very forgiving, though, so you won’t easily be able to adjust its tightness with overstitching.
2) Slip the next stitch, and then pass your previously slipped stitch over it. This makes one cast-off stitch for your buttonhole—repeat these two steps until you have cast off enough stitches for the desired width of your buttonhole. Turn your work.
3) Using a cabled cast on*, cast on as many stitches as you cast off plus one additional stitch. For example, if you previously cast off 4 stitches, you will want to cast on 5 new stitches using the cabled cast on. Turn your work.
4) With yarn at the back of work, slip one stitch from your left needle onto your right needle, then pass the extra cast-on stitch from your right needle over it. This closes the buttonhole—make sure that you pull your yarn a bit to tighten the hole and prevent gaps. Continue your row according to your chosen stitch pattern.
* Click here to reference our tutorial about the cabled cast on.

Two-row buttonhole
The two-row buttonhole is easier to make than the one-row buttonhole, but it is looser and you may want to edge it with a buttonhole stitch to reinforce its weak corners and keep it from stretching excessively.
R1) On the first row, cast off enough stitches for the desired width of your buttonhole. The two-row buttonhole is easier to make than the one-row buttonhole, but it is looser and you may want to edge it with a buttonhole stitch to reinforce its weak corners and keep it from stretching excessively.
R2) On the next row, cast on the same number of cast off stitches from the previous row to create the top edge of the buttonhole.
R3) (Optional) Using a buttonhole stitch*, stitch your way around the buttonhole. This will stabilize the buttonhole and keep its edges neat.
* Buttonhole Stitch: Insert the needle so the point is facing the opening of the buttonhole. Make a single straight stitch, being careful to keep the working thread under the point of the needle. Repeat around the edge of the buttonhole. This will create a twisted yarn edge around the buttonhole that will keep it from stretching out of shape.

K2P2 ribbing buttonhole
The one- and two-row buttonholes are good for flat stitch patterns like stockinette. If your button band is ribbed, though, you want a buttonhole that will almost disappear into the ribbing. You can also easily adjust this buttonhole’s size—if you would like it to be smaller, skip the Row 2 instructions and instead work Row 3 on the wrong side.
R1) On the right side, work along your row until you have one K stitch left before the two P stitches where the buttonhole will go. Work as follows: SSK, yarn over twice, K2tog, then work to the end of the row. The one- and two-row buttonholes are good for flat stitch patterns like stockinette. If your button band is ribbed, though, you want a buttonhole that will almost disappear into the ribbing. You can also easily adjust this buttonhole’s size—if you would like it to be smaller, skip the Row 2 instructions and instead work Row 3 on the wrong side.
R2) Next row (WS), work in pattern until you have one P stitch left before the double yarn over. Work as follows: P2tog, yarn over twice, SSP, then work to the end of the row.
R3) Work until you reach your buttonhole, K1 into the first yarn over and then P1 into the second yarn over. For each yarn over here, make sure that you pick up the loose carried threads from the RS double yarn over as well.
Tips and Tricks
-Don’t be afraid to use the buttonhole stitch for finishing your buttonholes. It gives your buttonholes a neatly finished edge and also prevents unwanted stretching. It also allows you to adjust the tightness of your buttonhole.
-Make sure that you space your buttonholes evenly across your work in order to prevent gapping and bunching.
-When sewing on your buttons, line them up carefully with where your buttonholes will actually fall against the opposite side of your garment opening instead of just relying on your measurements. Variations in your tension or other factors can cause your buttonholes to be slightly off-center from where your measurements may place them.

