

Sometimes you don’t want a solid color when you are dyeing yarn. It is possible to achieve gradated color when dyeing at home. In our Gradated Dyeing Tutorial, we demonstrate the technique using a finished scarf knit in our Bare yarn. This method can be used on either yarn or a completed project.
Lace Dyeing—Gradations
Supplies:
Waterbath canner or very large stock pot with rack for the bottom (stock pot must be able to hold a gallon glass jar with a couple inches to spare all around)
Gallon glass jar
10″ to 12″ long straight utensil to be used as a cross bar (all kinds of kitchen utensils could be used – we used an old fondue fork)
2 clothespins
Vinegar
Jacquard® acid Dyes
4 cup measuring cup
Timer
1/8 or ¼ teaspoon
Large metal spoon
Canning jar tongs (optional, but very helpful)
1. Fill a waterbath canner two-thirds full of water and start it heating at medium high on the stove. Place a rack in the bottom of the canner so that the dye bath jar does not sit directly on the bottom of the canner.

2. Soak the scarf in lukewarm water in the sink or a tub, squeezing gently but thoroughly to remove all air bubbles. The yarn needs to be completely saturated with water. There will be little white spots in the scarf if any air bubbles are left. Since the dye is dissolved and distributed in water, it cannot reach any spots that are not wet.

3. Pour 4 tablespoons of vinegar into a one-gallon glass jar. Add 3/8 tsp Jacquard acid dye and 4 cups warm water. Stir so all dye is dissolved.Note: Normally, Jacquard acid dye is used at a ratio of about ¼ teaspoon per 100 grams of yarn. In order to make sure enough dye is left at the end to color the palest section of the scarf, you will want to use about 50% more dye than normal. In this case, the scarf weighs 102 grams, so we used 3/8 teaspoon.

4. Fold the scarf in half. Hold at the fold and slowly lower the two ends into the dye water. Let several inches of the scarf rest below the dye water level. Place the cross bar between the two halves of the scarf, across the top of the jar. Clothespin the sides of the scarf together above this cross bar to keep the rest of the scarf from slipping into the jar. Balance the part of the scarf above the jar on the cross bar and the rim of the jar.

5. Place the whole dye bath jar in the waterbath canner. Set a timer for 5 minutes.

6. When the 5 minutes are up, add 2 cups of warm water to the jar. Carefully unclip the clothespins and lower the scarf a few more inches. Reset the clothespins. Using the cross bar and holding on to the scarf above it, gently raise the scarf from the dye bath and lower it back in again a couple of times—this makes sure the water you just added is mixed in, effectively diluting the dye and allowing it to flow freely around the new portion of the scarf lowered into the dye bath. The cross bar and clothespins prevent you from lowering the scarf too far—you want to lower it only several inches at each stage. Set a timer for 5 minutes.
Note: As you raise the scarf to mix in the new water, you will see distinct demarcation lines between stages. These will blend together a bit more as the scarf “percolates”, although you will still probably be able to identify the stages in the finished scarf if you look closely.
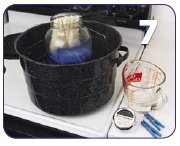
7. Repeat Step 6 several more times until clothespins are not necessary and in the last stage the half-way fold is directly on the cross bar. Make sure to add 2 cups of warm water at each stage and raise and lower the scarf to incorporate this clear water into the dye bath. (The scarf shown went through a total of five stages.)

8. Final stage: Pour the last 2 cups of water into the jar, directly onto the portion of the scarf still hanging over the cross bar. Since this part of the scarf has been out of the water for a while, this step will re-wet it, ensuring the dye will be able to move freely around the fibers. Remove the cross bar and let the rest of the scarf slip into the water. Swish it around with a long handled spoon to make sure it is fully immersed and saturated. You will notice that the water is quite pale now; most of the dye has already been used in the earlier stages. Set the timer for 5 more minutes.

9. Remove the glass jar from the waterbath canner (canning jar tongs are very helpful for this since it is hot) and pour the contents into the sink.

10. Rinse the scarf thoroughly with cold water. Squeeze gently. Repeat until the water runs clear.
11. Lay the scarf out on an old, large bath towel. Roll up the towel and walk on the roll to press out the excess water.
12. Block the scarf.

This technique works very well for yarn hanks too, achieving the effect of space-dyeing. It is also useful for other small knitted items like socks and mittens which can be clothespinned to the cross bar. In the case of these smaller items, raising the dye water level every 5 minutes will achieve the gradated look.
Lace Dyeing—Solids
As lace knitters know, knitting a complicated pattern with dark colored lace weight yarn can be very tiring for your eyes and frustrating to find and correct mistakes. A solution is to knit your project in one of our Bare yarns and then dye it a dark color that will show off an intricate lace pattern beautifully.
Follow steps 1-3 for gradated dyeing except add only ¼ tsp. Jacquard acid dye and fill jar 2/3 full of water. Let “percolate” in the water bath canner for at least 30 minues or until water is nearly clear, stirring every 5 minutes to ensure even dye distribution. Finish up with steps 9-12.