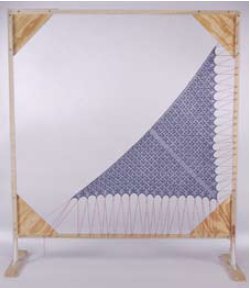
Build-It-Yourself Lace Blocking Frame
A lace blocking frame is a nifty alternative to blocking with wires or pins. With some simple construction, you can make and assemble your own frame that will serve you for years to come. The easy bolt and wing nut connections mean that you can take it apart and store the pieces under a bed, in a closet or the garage.
Blocking your lace on a frame has many advantages:
1. Once you get the hang of it, this method of blocking lace is much faster than other methods.
2. You aren’t forced to crawl around on the floor or bend over for hours pinning it to the carpet!
3. The greater flexibility permitted by adjusting the tension to each individual peak or point of your lace allows for more precision in blocking than the wires do.
4. Finally, your piece will look amazing framed for all to see like the work of art that it is!

Frame Materials:
(2) 1″x 2″x 6’ lengths of wood (top and bottom of frame)
(2) 1″x 2″x 7’ lengths of wood (sides of frame)
(2) 2″x 4″x 2’ lengths of wood (floor braces)
(1) 2’x 2’x .” sheet of plywood
(cut diagonally into 4 triangles for corner braces)
(16) 1 1/2 x 1/4” bolts
(16) 1/4” cut washers
(16) 1/4” #20 gauge wing nuts
(2) 1 1/2 x 1/8” bolts (optional)
(2) 1/8” cut washers (optional)
(2) 1/8″ wing nuts (optional)
(4) 5″x 7″ metal shelf brackets (“L” brackets)
(12) 1/2″ #6 screws
(144) 1 1/4″ #16 wire nails

Tools:
Power drill
1/4″ and 1/16″ drill bits
Screwdriver
Hammer
Tape measure
Pencil
Saw (if lumber not precut by supplier)

1. Using the power drill fitted with the 1/4″ drill bit, drill 4 holes in each of the 7’ pieces of lumber spaced at the following intervals: 2″ and 14″ from one end, 11″ and 23″ from the other end. The holes should be centered across the width of the wood at 3/4″ from either side. Place these pieces aside.
2. Using the power drill fitted with the 1/4″ drill bit, drill 4 holes in each of the 6’ pieces of lumber spaced at the following intervals: 2″ and 12″ from one end, 2″ and 12″ from the other end. The holes should be centered across the width of the wood at 3/4″ from either side. Place these pieces aside.

3. Gather one of the lengths of 2″x 4″ and two of the “L” brackets. Center the brackets on the piece of lumber lengthwise, leaving 3/4″ of space between the two for the leg of the frame to stand in. You will want the short side of the bracket joined to the floor brace. Mark the places where you will put screws in with a pencil. Remove the brackets and predrill the holes using the power drill fitted with the 1/16″ drill bit. Replace the brackets and use the screwdriver to fix the brackets in place with the 1/2″ metal screws. Repeat on the second floor brace.

4. Next you will drill the holes into the triangular corner braces. (It’s helpful to lay out the frame first so that you can accurately determine where to drill the holes.) When the frame is laid out, slip the corner braces underneath each corner and mark the drill holes with your screwdriver. Insert the tip of the screwdriver through the hole in the frame until it touches the corner brace. Tap the end of the screwdriver with your hammer to make a small dent on the corner brace. Repeat for all four holes with all four corner braces. Remove the corner braces and bore the holes where marked using the power drill fitted with the 1/4″ drill bit.

5. Now that all holes have been drilled, it is time to attach the nails to each piece of the frame. (If you’re not sure about whether your frame is going to fit together properly, you can skip this step and come back to it later.) The distance between your nails is partially personal preference, but we recommend no more than 2 1/2″ apart. Our frame has nails every 2″. Measure and hammer in your nails, making sure that you sink them at least 1/2″. Be sure you don’t attach nails to the bottom portion of the sides of the frame that will sit in the brackets!

6. You are now ready to assemble the frame. Lay the pieces out on the floor with the nails facing down, line up the corner braces and place a bolt in each hole as follows: enter through the front side of the frame (side with nails), exit through the back side of the corner brace. Place a washer and then a wing nut on the end of the bolt. Repeat this process until all holes are bolted. Tighten wing nuts if necessary so that frame does not shift.
7. Raise the frame from the center of the top piece. If you stand less than 6’ tall, you might consider standing inside the frame opening as you raise it up. Once it is upright and steady, slide each leg into its floor brace. If desired, use the optional bolts, washers, and wing nuts from the materials list to reinforce the join between the frame and the “L” brackets. This will provide increased safety if you plan to block aggressively, move the frame frequently, or you have children or pets that may bump into the frame.
Notes: These are basic instructions and can be modified to meet your blocking needs. For instance, if a 6’ frame is too large for you to manage, you can create a smaller frame simply by using shorter pieces of wood. Just make sure that the sides of the frame are always one foot longer than the top and bottom so that they can be affixed to the floor braces. You are now ready to begin blocking!

