

Pockets! Pockets! Pockets!
We offer you these three easy pockets to add on to any existing pattern, either while knitting or afterwards.
Horizontal Pocket with Flap
1) Knit your pocket lining a bit smaller than the desired dimensions because the lining will stretch out with use.
2) Knit a flap for your pocket that is the width of your pocket lining. We knit a triangle flap, but your flap could be in any shape. Feel free to experiment with different closures—you may want to add a buttonhole.

3) In the garment, bind off the desired number of stitches for the pocket opening, then work to the end of the row.

4) On the next row, join the pocket lining to the pocket opening. To do this, work across your row and stop one stitch before where your pocket opening begins. (a)Take your pocket lining and hold it up to the pocket opening—the wrong side of the lining and the wrong side of your garment should both be facing you. (b)Insert your right needle purlwise into the last stitch before the pocket bind off, and then insert your right needle purlwise into the first stitch for the pocket lining off of the stitch holder. (c)Purl these two stitches together and then continue working across your pocket lining.

5) On the following RS row, repeat the pocket joining instructions with your pocket flap. Make sure that your pocket flap and the body of your garment both have their right sides facing you.
6) Lightly baste the pocket lining into place—this will help you to match up your rows and stitches exactly.
7) Using single stitches along the selvedge edge, stitch your pocket to the main body of your garment.
Afterthought Pocket with I-cord Border
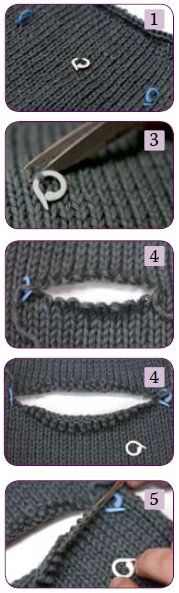
1) Decide how many stitches wide your pocket will be to achieve the desired dimensions. Mark with stitch markers.
2) Choose the row where you would like the pocket opening.
3) Using a pair of scissors, cut half a stitch in the middle of your pocket width.
4) Pull out the yarn of the row you cut, half a stitch at a time, in either direction until the opening is as many stitches wide as you decided in Step 1. You now have two rows, upper and lower, of live stitches. Don’t cut the yarn tails left over—you can use them later to stabilize the corners of your pocket.
5) Pick up the lower row of stitches and finish them off with an I-cord border.
6) Pick up the upper row of stitches and knit back and forth to create the lining for your pocket. After you have knitted about an inch of pocket lining, begin to increase the width of your pocket lining until it is as wide as you would like.
7) Finish knitting the pocket to a bit short of desired length since it will stretch with use. Bind off your stitches. Sew down the sides and bottom edges to the main fabric of your knitted garment.
Slanted/Diagonal Inset Pocket
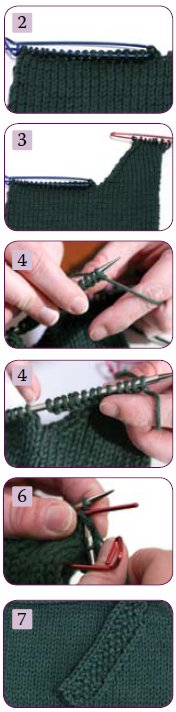 1) Decide where you would like to place your diagonal pocket, and then figure out your desired details— width, depth, and the angle of the pocket opening.
2) Work your knitted garment until you reach where you would like the pocket opening to be. Place the remaining stitches on a stitch holder.
3) Turn your work and work your active stitches, making decreases at the pocket edge. You will have to plan your decreases to give you your desired pocket angle— decreasing every other row will give you a steep angle for the opening, while decreasing every fourth row will give you a shallower angle. Continue working these stitches until you reach the desired depth of your pocket. Finish a WS row and then place all of these stitches on a stitch holder.
4) Pick up the stitches from your first stitch holder. Using a second ball of yarn, cast on stitches until you have enough to make up the width of the pocket lining. Note: the stitches you picked up from the holder are not included in the width of the pocket lining.
5) Work these stitches until your pocket lining is as deep as you’d like your pocket to be. End with a WS row.
6) Work across the RS row of the pocket face, then rejoin the stitches together by working the lining stitches together with the pocket face stitches. Work to the end of the row.
7) Add a decorative edge to the slanted pocket opening. Here, we’ve added a ½” wide seed stitch border.